Download Meshmixer — Free 3D Mesh Editor (2026)
Edit, repair, and prepare 3D models for printing. Autodesk’s free mesh tool lets you sculpt, hollow, add supports, and fix STL files in minutes.
What Is Meshmixer?
A complete guide to Autodesk’s free mesh editing tool used by thousands of 3D printing enthusiasts worldwide.
Meshmixer is a free 3D mesh editing application developed by Autodesk, designed for working with triangle mesh files like STL, OBJ, PLY, AMF, and 3MF. Available as a free download for Windows and macOS, Meshmixer has become one of the most widely used tools in the 3D printing community for preparing models before they go to the printer. It handles tasks that full 3D modeling suites like Blender make complicated — repairing broken meshes, hollowing solid models, generating support structures, and combining separate parts into a single printable file.
Often called the “Swiss Army knife” of STL editing, the Meshmixer app fills a specific gap in the 3D printing workflow. While slicers like PrusaSlicer and Cura handle the final step of converting models to G-code, and CAD tools like Fusion 360 handle original design, Meshmixer sits in between — it takes existing 3D models and makes them print-ready.
Who Uses Meshmixer?
Meshmixer is popular with a wide range of users, from hobbyist makers running FDM printers at home to professional engineers preparing models for SLA resin printing. Typical use cases include:
- Repairing non-manifold meshes and fixing holes before slicing
- Hollowing resin models to save material and reduce print time
- Generating tree-like support structures for resin printers
- Combining multiple STL files into one mesh for single-print assembly
- Sculpting organic modifications onto existing models
- Reducing polygon count on high-detail scans for faster slicing
Is Meshmixer Still Available?
Autodesk discontinued active development of Meshmixer around 2021, but the software remains fully functional and available for download. The current version, Meshmixer 3.5 (build 474), runs without issues on modern Windows 10 and Windows 11 systems. No subscription, no Autodesk account, and no license key is required — it is completely free. Many users continue to rely on the Meshmixer program because no single free alternative matches its specific combination of mesh repair, hollowing, support generation, and sculpting tools in one lightweight package.
Key Features
Meshmixer packs professional-grade mesh editing tools into a free, focused application built for 3D printing workflows.
Drag-and-Drop Mesh Mixing
Import and combine 3D models by dragging parts onto each other. Merge multiple meshes, transplant features between models, and create mashups from separate STL files in a single workspace.
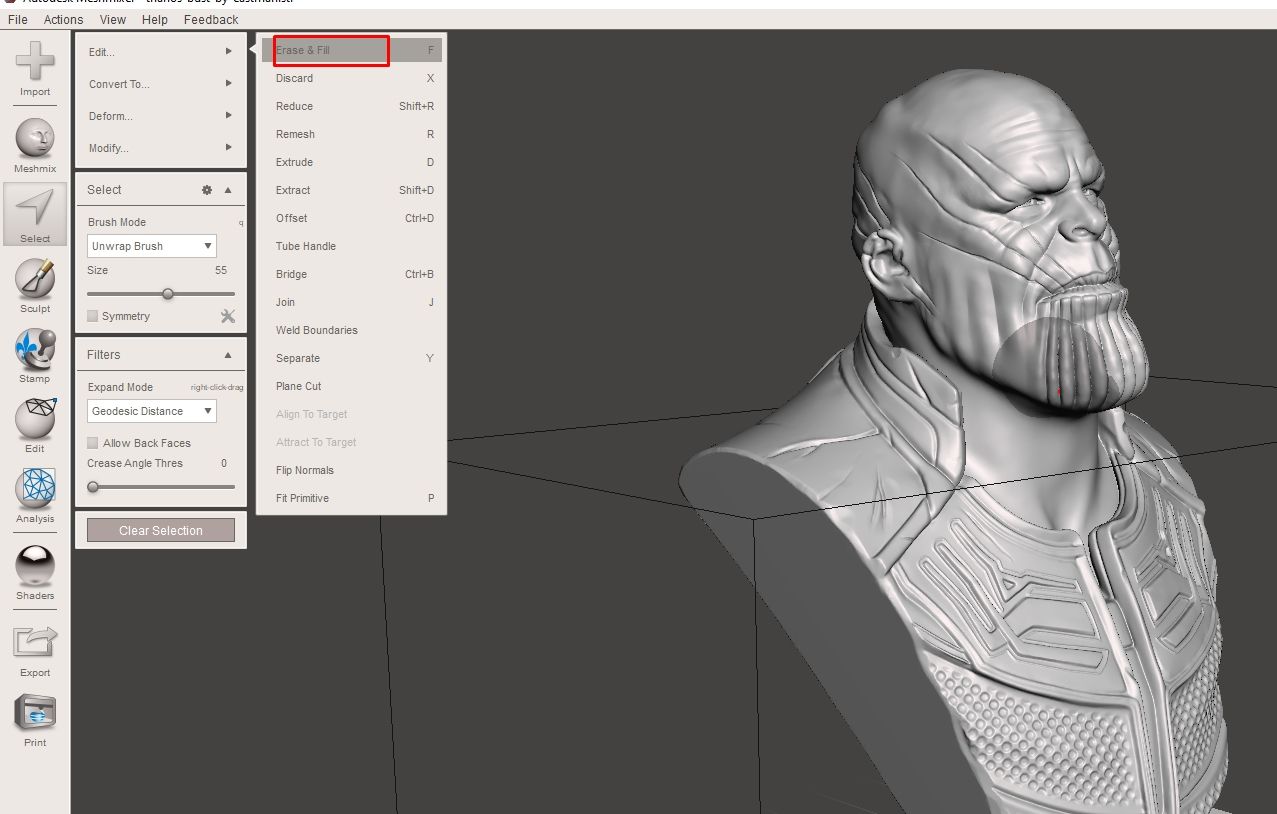
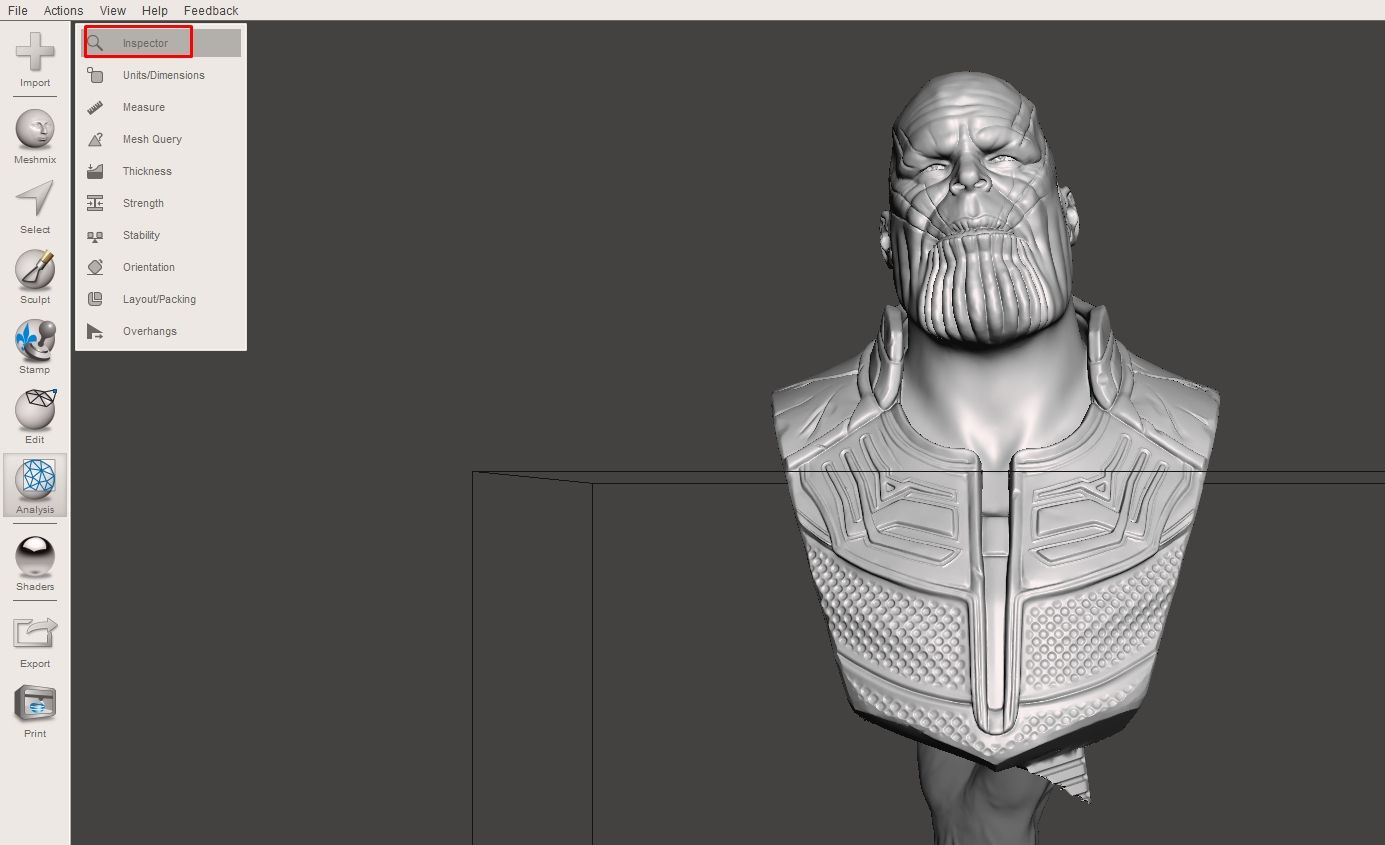
Auto-Repair (Inspector)
One-click detection and fixing of mesh errors including holes, flipped normals, non-manifold edges, self-intersections, and floating islands. The Inspector tool is essential for 3D print preparation.
3D Sculpting & Surface Stamping
Smooth, inflate, crease, and grab brushes for organic deformations. Stamp patterns and textures onto surfaces in a workflow similar to ZBrush, without the complexity of a full sculpting suite.
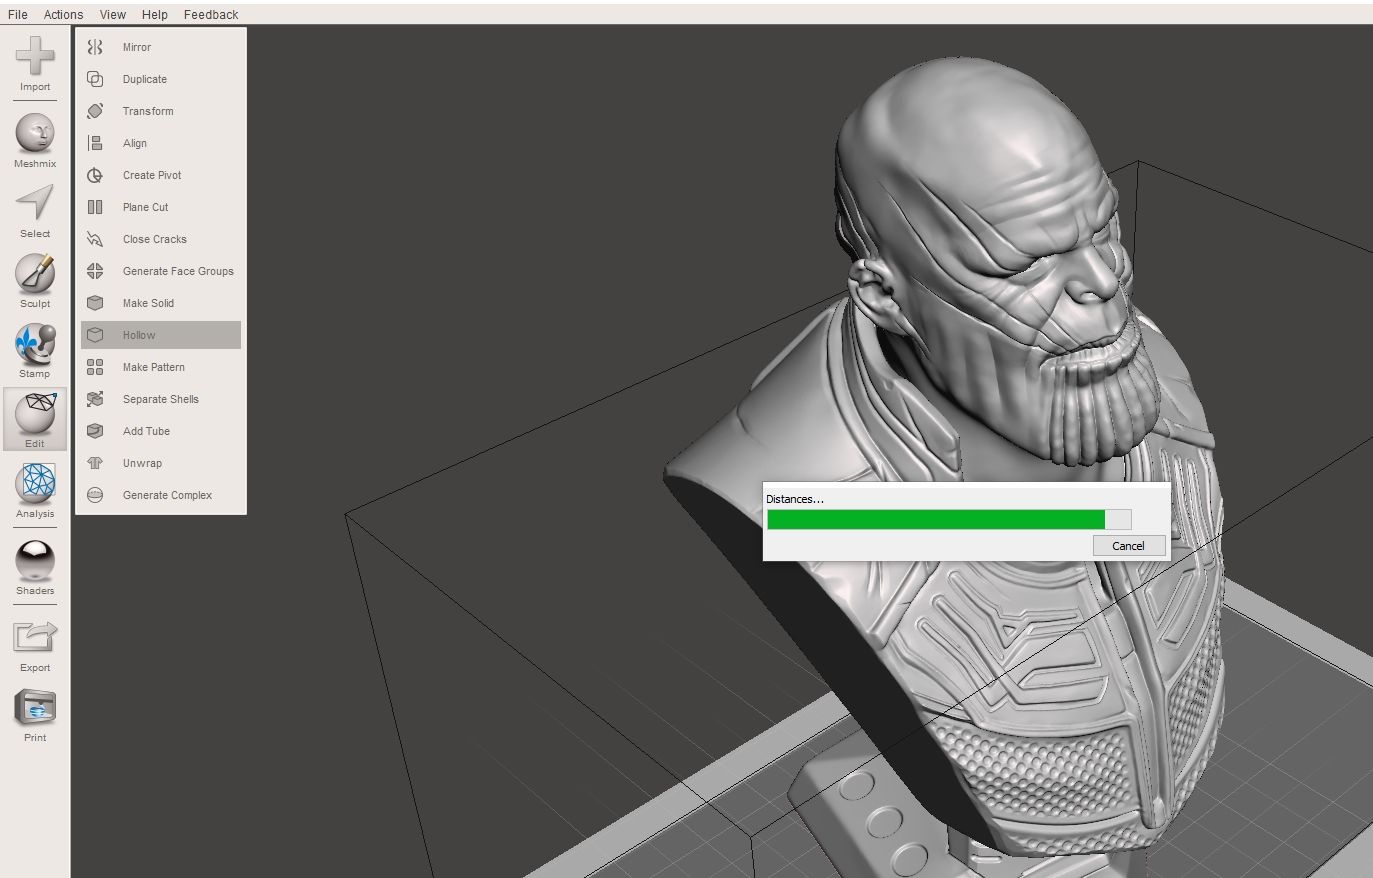
Hollowing with Escape Holes
Convert solid models into hollow shells to reduce material cost and print time. Add drain holes for resin printing to prevent suction issues during the peel process on SLA/DLP machines.
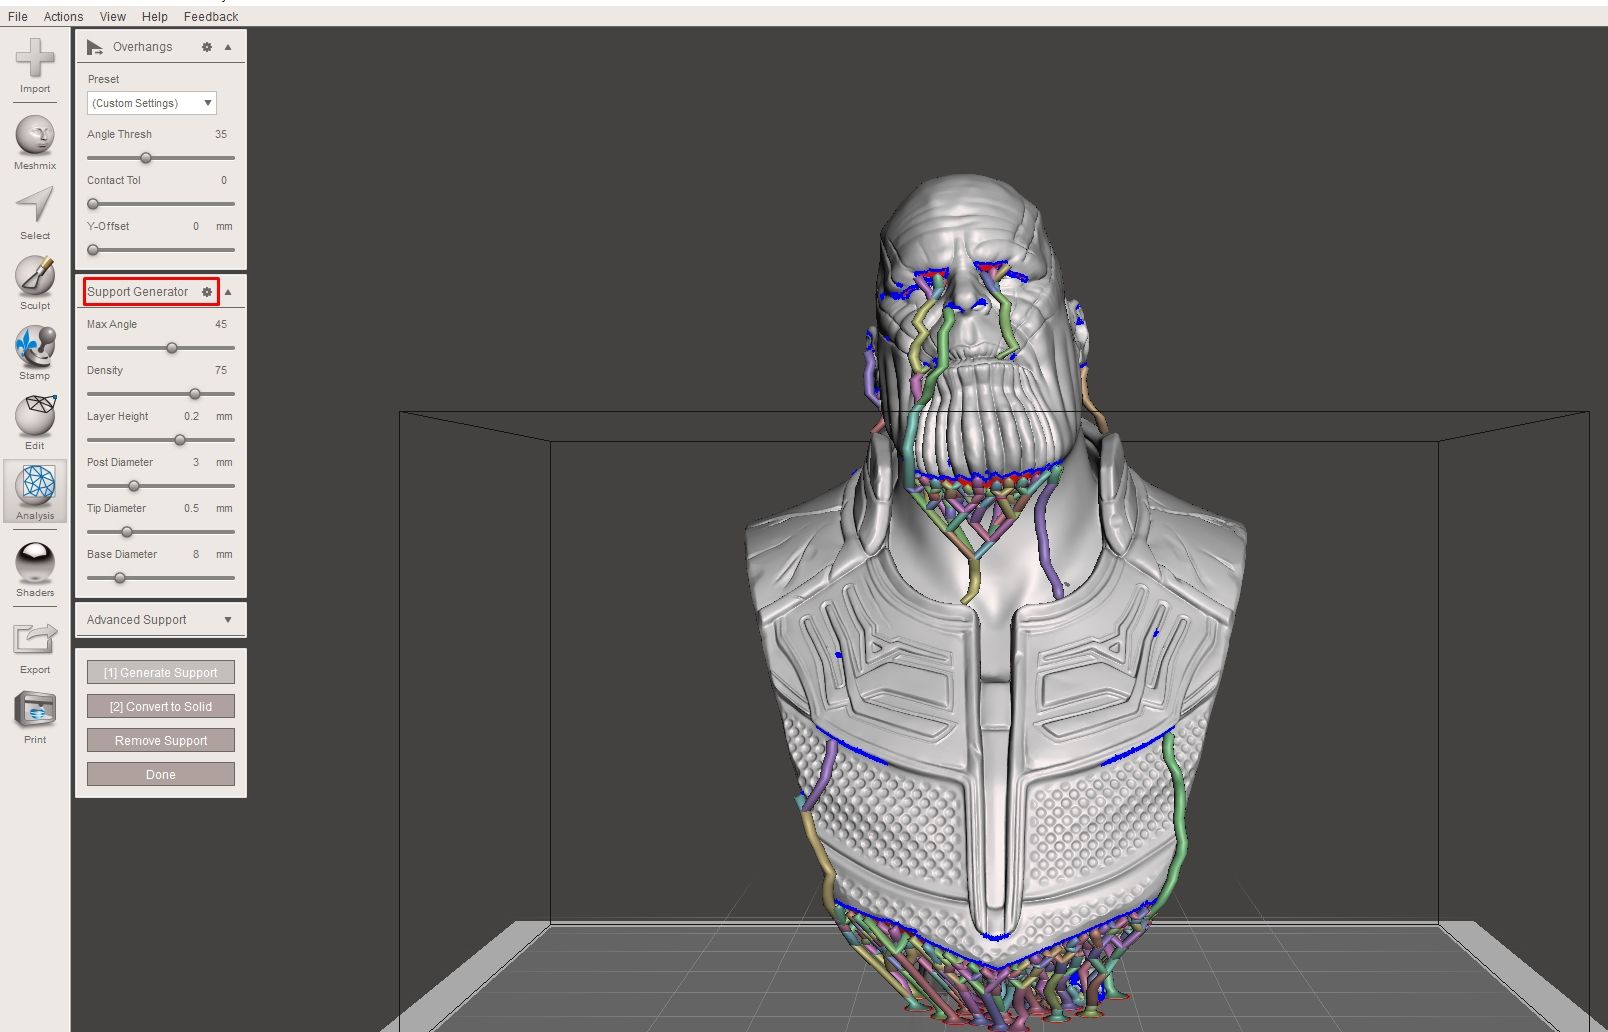
Branching Support Structures
Generate tree-like support structures designed specifically for resin printers. These supports snap off cleanly after printing, leaving minimal marks compared to traditional slicer-generated supports.
Boolean Operations & Make Solid
Fuse or subtract parts using boolean operations (union, difference, intersection). Convert messy 3D scans into watertight, printable shells with the Make Solid tool.
Remeshing & Simplification
Add or remove triangles exactly where detail is needed. Reduce polygon counts on high-resolution scans for faster slicing, or increase density in areas that need finer detail.
Plane Cuts & Mirroring
Split models along custom planes for multi-part printing of large objects. Mirror geometry across any axis to create symmetrical designs from a single half-model.
Thickness & Stability Analysis
Detect thin walls and structurally weak sections before printing. The analysis tool highlights problem areas with a color map so you can reinforce them before wasting material on a failed print.
Need to check if your system can run Meshmixer? View system requirements
System Requirements
Meshmixer runs on modest hardware. Here are the minimum and recommended specs for a smooth experience.
| Component | Minimum | Recommended |
|---|---|---|
| Operating System | Windows 7, 8, or 10 (64-bit) | Windows 10 or 11 (64-bit) |
| Processor (CPU) | 64-bit Intel or AMD processor | Multi-core 64-bit processor |
| RAM | 4 GB | 8 GB or more |
| Storage | 500 MB free disk space | 1 GB free (for temp files) |
| Graphics (GPU) | OpenGL 3.3 compatible | Dedicated GPU with 2 GB VRAM |
| Display | 1280 × 800 resolution | 1920 × 1080 (Full HD) |
| Other | .NET Framework (bundled with installer) | Mouse with scroll wheel |
Meshmixer 3.5 has been tested and works on Windows 11 despite Autodesk only officially listing Windows 7/8/10 support.
Ready to install? Download Meshmixer 3.5 now
Download Meshmixer 3.5
Get the latest version of Autodesk Meshmixer — completely free, no account required.
Meshmixer for Windows
First time installing? Follow our step-by-step setup guide
Screenshots
See how Meshmixer looks in action — from the main viewport to specialized editing tools.

How to Install Meshmixer
Follow this step-by-step guide to download, install, and set up Meshmixer on your Windows PC in under five minutes.
1 Downloading Meshmixer
meshmixer-win-3-5-474.exe, approximately 113 MB) will begin downloading to your computer.
C:\Users\[YourName]\Downloads).
2 Installing Meshmixer
meshmixer-win-3-5-474.exe installer file to start the setup wizard.
C:\Program Files\Autodesk\Meshmixer. Unless you have a specific reason to change it, keep the default and click “Next”.
3 Initial Setup
4 Getting Started
Have questions about Meshmixer? Check our FAQ section below
Frequently Asked Questions
Answers to the most common questions about downloading, installing, and using Meshmixer.
Is Meshmixer free to download?
Yes, Meshmixer is completely free to download and use. There are no paid tiers, no subscriptions, and no feature restrictions. Autodesk released Meshmixer as freeware, meaning anyone can download and use the full version without paying anything. You do not need an Autodesk account or license key to install or run it.
Is Meshmixer still available since Autodesk discontinued it?
Yes, Meshmixer is still available for download even though Autodesk stopped developing new versions around 2021. The last release, version 3.5 (build 474), remains fully functional and can be downloaded from this page. Autodesk has not removed the download links, and the software continues to work on modern Windows and macOS systems without issues.
Does Meshmixer work on Windows 11?
Yes, Meshmixer 3.5 works on Windows 11 without any known compatibility problems. Although Autodesk’s official system requirements list Windows 7, 8, and 10, users have confirmed that the application runs correctly on Windows 11 (64-bit). No compatibility mode or special settings are needed — just install and run normally.
Is Meshmixer safe to download?
Yes, Meshmixer is safe. It is published by Autodesk, a publicly traded company and one of the largest software developers in the world. The installer is digitally signed with Autodesk’s code signing certificate, which you can verify by right-clicking the downloaded file and checking Properties > Digital Signatures. Always download from a trusted source to ensure you get the authentic, unmodified installer.
What file formats does Meshmixer support?
Meshmixer supports these 3D file formats: STL (the most common 3D printing format), OBJ (supports textures and vertex colors), PLY (polygon file format used in 3D scanning), AMF (Additive Manufacturing Format), and 3MF (3D Manufacturing Format). For most 3D printing workflows, you will primarily work with STL files, which Meshmixer can both import and export in binary or ASCII format.
How do I repair STL files in Meshmixer?
To repair an STL file, open it in Meshmixer and go to Analysis > Inspector. The Inspector tool will scan your model and mark all detected problems with colored spheres — blue for holes, red for non-manifold edges, and magenta for flipped normals. Click “Auto Repair All” to fix everything automatically, or click individual markers to handle them case by case. After repairing, export the file via File > Export as STL (Binary) for the best results.
How do I hollow a 3D model in Meshmixer?
Open your model in Meshmixer and go to Edit > Hollow. Set the wall thickness (typically 1.5-3mm for resin prints), the mesh accuracy (higher = smoother but slower), and the number of escape holes. Escape holes are drainage points that allow uncured resin to drain out of the hollow interior. Click “Update” to preview the result, then “Accept” when satisfied. Hollowing significantly reduces material usage and print time, especially for resin printing.
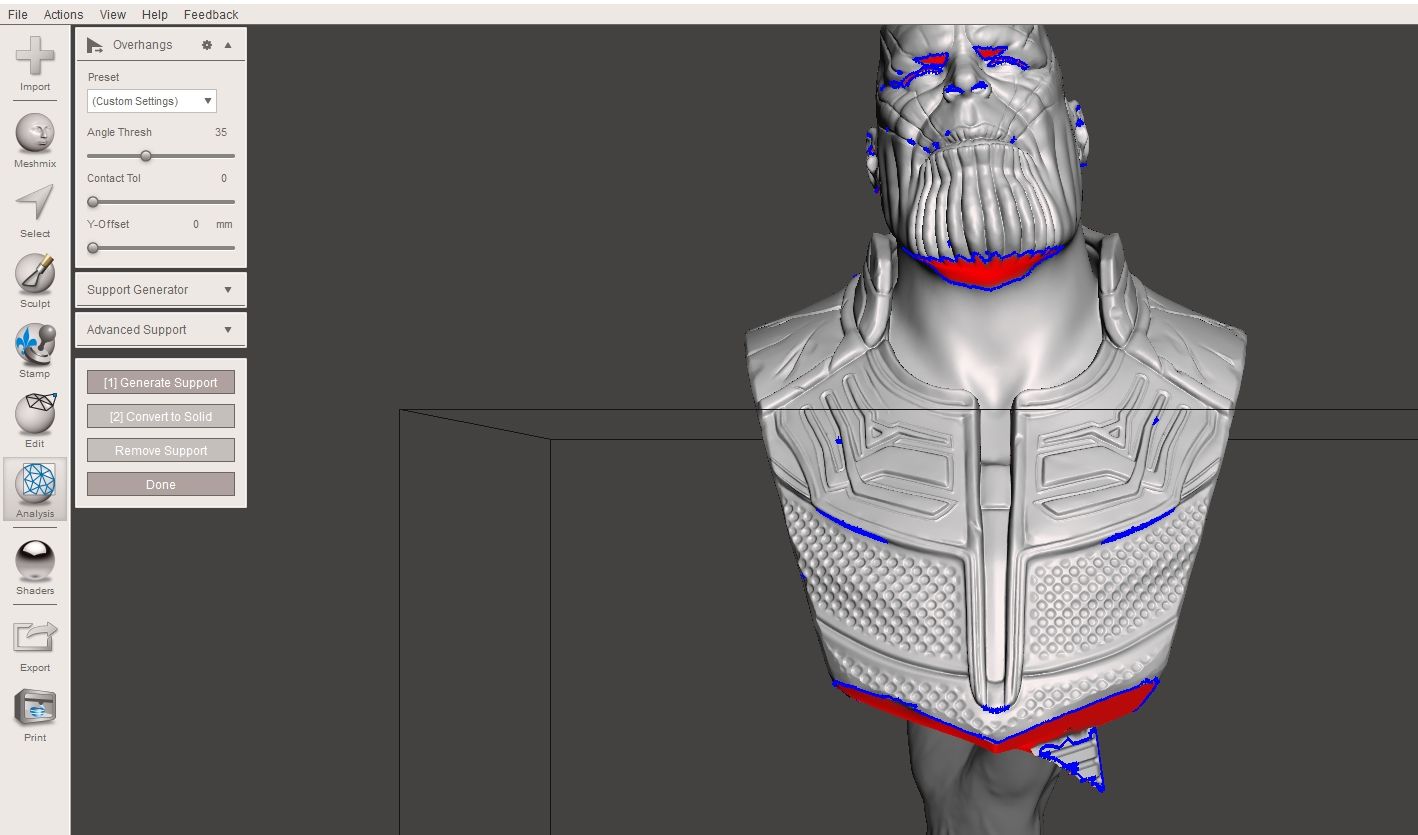
How do I add supports in Meshmixer for 3D printing?
Go to Analysis > Overhangs in Meshmixer. The tool detects areas of your model that need support based on an angle threshold (typically 45 degrees). Click “Generate Support” to create tree-like support structures automatically. You can then manually add, remove, or adjust individual support pillars by clicking on the model surface. Meshmixer’s branching supports are especially popular with SLA/DLP resin printer users because they use less material and snap off more cleanly than grid-based supports from slicers.
Meshmixer vs Blender — which is better for 3D printing?
It depends on what you need. Meshmixer is better for quick, focused 3D printing tasks like mesh repair, hollowing, support generation, and combining models. Blender is a complete 3D creation suite with modeling, animation, rendering, and more — but its mesh editing workflow for print preparation is more complex. For someone who just wants to fix an STL, hollow it, and add supports, Meshmixer is faster and simpler. For creating original 3D models from scratch, Blender is far more capable. Many 3D printing enthusiasts use both tools in their workflow.
Does Meshmixer work on Mac?
Yes, Meshmixer has a macOS version available. However, the Mac version may have compatibility issues on newer macOS releases (particularly macOS Catalina and later) since Apple dropped support for 32-bit applications and Autodesk stopped updating Meshmixer. Users with Apple Silicon (M1/M2/M3/M4) Macs can try running the Intel version through Rosetta 2, though performance may vary. For the most reliable experience, Windows 10 or 11 is recommended.
How do I combine two meshes in Meshmixer?
There are two main approaches. For simple combining, use File > Import to load a second model into the scene, position it with the Transform tool, then use Edit > Boolean > Union to merge them into one solid mesh. For drag-and-drop mixing, open the Meshmix panel, drag a part from the library onto your model, and Meshmixer will blend the surfaces together. The Boolean Union approach works best for separate objects, while Meshmix is better for attaching features (like adding horns to a helmet).
What are the best alternatives to Meshmixer in 2026?
The closest alternatives to Meshmixer include: Blender (free, full 3D suite with mesh editing), MeshLab (free, specialized in large mesh processing and cleaning), Microsoft 3D Builder (free, built into Windows, very basic editing), PrusaSlicer (free slicer with basic mesh repair), and Autodesk Fusion 360 (freemium, has some mesh tools as Autodesk’s successor product). None of these are direct 1:1 replacements — Meshmixer’s combination of hollowing, tree supports, and sculpting in one lightweight package remains unique.